

ASIAN FUSION
Standard Poodle
SUE WRIGHT
FRANKIE
This tutorial walks through a full Asian Fusion groom on Frankie, focusing on strong patterning, bold shape, and clean structure. The groom features a short body, flared legs, a decorative heart detail, a defined collar, and a rounded Asian-style head that balances width and expression.
Sue breaks the groom down step by step, showing how to block the pattern first, then refine it through scissoring and blending. There’s a big emphasis on proportion: keeping the body compact, the legs wide without making the dog look long, and building a face that stays open, clean, and expressive.
This is a detailed, start-to-finish groom with plenty of practical decisions explained along the way.
Part 1 – Cutting in the body
The groom begins by setting the main pattern with clippers, including the rough collar, heart detail, and body length. Pattern lines are placed through the front and back legs, with careful blending through the flanks to keep the body compact and balanced before moving on to scissoring.
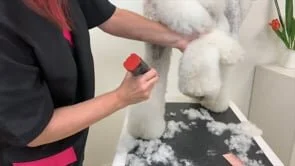
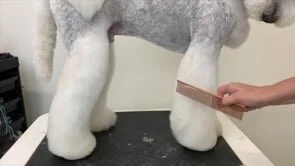
Part 2 – Scissoring legs, heart and collar
This section focuses on refining shape with scissors. Wide feet and flared legs are set in, connections are made from the body down to the feet, and balance is checked from all angles. The heart detail and collar are then scissored and softened to finish the decorative elements cleanly.
Part 3 – Head and finishing
The groom is completed with detailed head work, including eye opening, muzzle shaping, and building a rounded Asian-style head. Final blending, proportion checks, and a finishing accessory bring the groom together.

Study Notes | Key Concepts
-
Set the collar line and heart shape with a #7 blade, starting from the throat down to the breastbone.
Keep symmetry by setting the top of the flank to the bend in the leg for a balanced look.
Use the #7blade on the body, excluding the heart and collar, blending carefully to avoid harsh lines.
-
Use a #3 attachment to create flared legs with a tight top and wide bottom.
Check from all angles to ensure even blending, using chunkers as needed for smooth transitions.
-
Shape wide, rounded feet by scissoring across the front, sides, and bottom.
For the tail, use a one-inch attachment over a #30 blade, blending to keep it proportional to the body.
-
Use a #15 or #10 blade to clean under the eyes and create “kissy lips” for a polished muzzle.
Check symmetry in the muzzle width, ensuring balanced proportions from each side.
-
Create a mushroom head by scissoring around the head in a circular shape, blending from the collar line.
Use volumising techniques to keep the head round, with clear visibility in the visor area.
QUICK LINKS
All Asian Fusion Tutorials

Search igroomhub

Directory Page | The Groomerverse

Professional Dashboard
