
MASTERCLASS

The German Trim
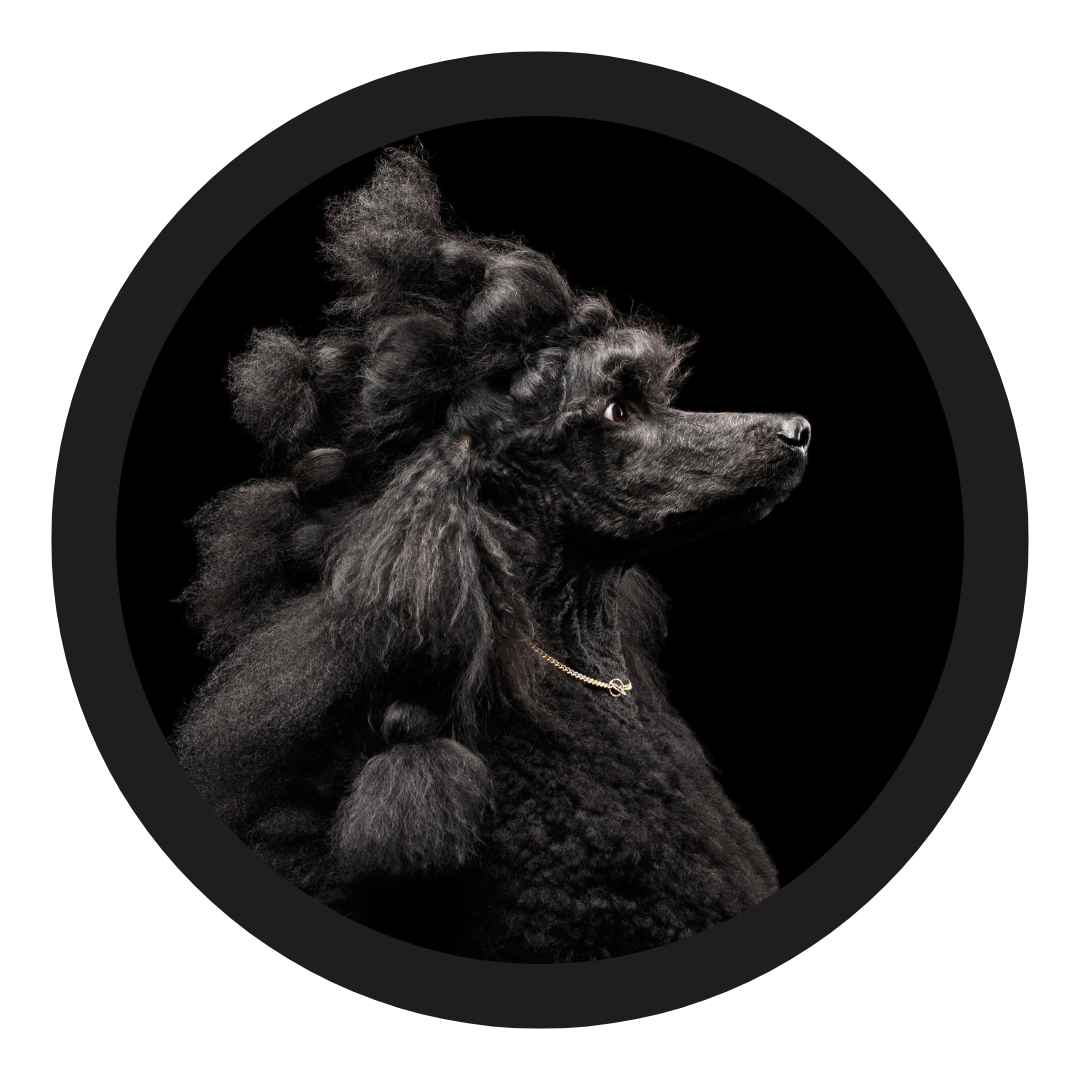
KORO
Meet the lovely Koro! Prue's beautiful Standard Poodle. Prue is setting him into a German Trim. He has 7 months of growth and has been washed in ProGroom Black Shampoo. He has been fluff dried and combed through, all ready for a new look!
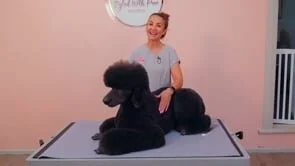
PART 1 Blocking in the body with clippers
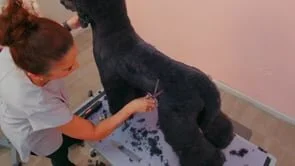
PART 2 Prue uses her straight scissors to neaten the topline, ribs, and places where she has blocked in a pattern with clippers
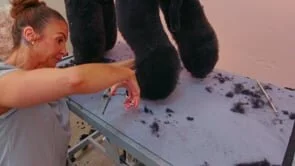
PART 3 Setting in the back foot with a beautiful bevel, then onto the front bevels
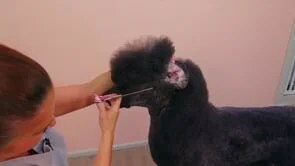
PART 4 Koro's topknot is about to take shape! Prue styles the top knot to balance the groom. She uses products to support the hair and hold the shape.
Breed Standard at Dogs Australia
Study Notes | Key Concepts
-
Proper prep work is crucial for a plush finish. Wash, condition, and fully dry the dog before grooming.
Comb through with a poodle comb to ensure the coat is untangled and ready for trimming.
-
Use different blades for different sections: a #4 blade for the body, #3 for the top line, and #5 for the tail base.
Use scissors to refine areas where clipper work doesn’t provide a perfect finish.
Blades should be used lightly to avoid skin irritation and uneven cuts.
-
Start with a #3 blade on the back, skimming over the ribs rather than clipping too tight.
Scissor the ribs to shape and blend, ensuring a smooth transition from the top line to the body.
Avoid making the top line too severe; aim for a balanced, masculine look.
-
The ears can be clipped with a #4 blade to maintain some fluff while still keeping a defined shape.
When working around sensitive areas like the ears and tail, use caution and always check for evenness on both sides.
Blend the tail base using a #5 blade, with final scissoring to create a neat finish.
-
Shape the legs to be full but not bulky. Use scissors to curve and refine the leg shape.
Bevel the feet to create a neat, rounded look. You can use scissors or a #40 blade for this, depending on the coat length.
Always comb and check the feet and legs multiple times to ensure evenness.
-
For the top knot, use a volumising powder or spray for extra lift and shape.
The head should have a soft, rounded appearance but remain masculine. Use curved scissors to create the final look.
Double-check the entire groom for symmetry, ensuring the dog stands straight and balanced before finishing.
TYRION
This is a fancy terrier type trim called the short T trim or the German trim. Face feet and sanitary clipper work are all done, do not shave the base of the tail.
The German trim is a great trim because it can look fancy with a minimum amount of hair when executed with skill. The trim is shown here with the majority of trimming and shaping done with clipper blades and clipper combs. Using clipper combs can help you work faster and with more consistency.
WITH JULIE WILKINS PANTAGES
Introduction to The German Trim

What we are aiming for
Setting up for success
To start the German trim, you want your poodle to be completely bathed and dried, following the steps outlined in “Poodle Prep”.Also the poodle’s face, feet and sanitary area should be clippered with a #15 blade (or an adjustable blade on the middle setting) DO NOT SHAVE THE BASE OF THE TAIL.
Your dog must stand “square” at all times while being trimmed. If your dog is sitting and you think that’s okay because you’re just trimming the front, the result will be that your front trim will turn out wrong as it will be unbalanced. I also like to have my poodle standing with their tails up because it teaches them that their tail should be up when I’m working on them. It helps balance the outline in my eye, as I’m working on them. In the video shown here, the poodle is being held on a grooming arm and grooming loop. You will notice that the loop is not tight and the dog is not leaning into it in any way. It is simply there for safety reasons. I usually groom my poodles with no grooming arm or loop. I feel that if you teach your Poodle how to hold it’s shape on the table, your trim will turn out better AND when it comes time to show your Poodle, it is easier to transfer that shape onto the floor while showing them. This is how to get the best results.
Of course for the salon groomer a grooming loop and grooming arm is necessary for the safety of the dog and groomer.
Equipment used
Chris Christenson Spectrum One Shampoo and Conditioner
CCS Bottoms Up Spray
CCS “Thick n Thicker" Spray
Continuous Spray Bottle
CCS Coral Slicker
CCS Combs
Straight and curved shears
Wahl Clippers
#40 #30 #10 Blades
Wahl Clip on Comb Set
Grooming table
Grooming Loop
Grooming arm and clamp

Getting started
When executing the German Trim, you can easily adjust the coat length desired by you or your grooming client by simply switching out the blades recommended here.This can also help you improve the look of any structural faults your poodle may have.
**Please remember if using this trim to for an official class at Poodle Club of America or other that the ears cannot be done with a #40 blade as they require at least a “blanket” of hair covering them.**
Start by shaving the ears.You can shave the ears with almost any blade depending on how extreme you like the trim to be. The ears can even be done with a #40 blade. **be aware that according to AKC rules the ears and tail must have “a short blanket of hair on them” and therefore should be scissored or shaved with a blade longer than a #7F.
The tail and the ears should be in balance. This is easy to do if you use the same blade for the tail and for the ears. In our example we have used a #5F blade on both.
When doing the ears you are holding the ear leather in your hand and skimming the top of the ear being careful not to clip any of the ears flaps. You start the clipper just up over the top of the ear set.This technique automatically sets where the bevel will be when we trim the topknot.
We like the front of the tail to be built up a little longer than the back of the tail. Taking the back of the tail shorter also helps make the poodle look shorter backed. You can scissor the back of the tail down to the skin. The shorter the back of the tail the higher you can make the tail set appear. Starting at the base of the tail wrap the clipperwork around to the side as you clipper to the top of the tail.
Getting started with the German Trim
Step 2 - Topline
Step 2 - Topline
Switching to a #1 clipper comb over a #30 blade for the top-line.
The hallmark of the German trim is the lovely long crested neck it gives us.
Start trimming the top-line just behind the withers clipper towards the base of the tail.
Just before you get to the base of the tail you are going to swoop the clippers up towards the tail. By doing this you are creating the illusion of your poodle being as short backed as possible.
To create less scissor work at the end lightly skim the clippers at the withers where it meets the topline and again at the topline before it meets the base of the tail.Practice makes perfect but a light touch is recommended here.
Rear Angulation
The quickest and most consistent way to trim in beautiful flowing angulation on the rear legs is with your clipper-comb.
Take your comb and comb all the hair on the back of the back legs up and out.If needed you can spray with a bit of CCS Think n Thicker to help hold the hair in place.
Using a #1 comb (if you are doing a miniature poodle or a toy poodle or simply want the angulation to be more pronounced you could use a #2 comb).
Start the clipper-work just below the pin bone.
From below the pin bone to the bend in the leg (where the legs bends at the back across from the stifle) you will press the clippercomb to the dog’s leg as you trim BUT as you get to the bend you use a scooping motion and move the clipper away from the leg and pull the scooping motion towards the hock to create the angualtion.
Picking up the opposite leg from the one you are working on you will clean up the inside of the first leg.
When looking at a dog’s profile draw an imaginary line from pin bone to floor. It should land in front of the toes with the hock set straight. If the hock is straight and the imaginary line lands on the toes the dog is lacking rear angulation.If this is the case then you need to use your interpretation of the standard to trim the hock for the desired look.
Go over the clipperwork several times so that you have less scissor work later on.
Rear Angulation - German Trim
Body
Switching to the O comb (A comb is a little longer, and the #2 comb will leave it a little shorter) we are now ready to do the body.
Starting under the ear comb all the body hair up and then clipper down from under the ear to over the shoulder.
You are pressing again the body until about midway through the shoulder, then just skim down the rest of the way to the top of the front leg.
Moving onto the body start at the withers and then keep clipping from there to the back of the body.
Leave the hair above the withers and at the hip to be blended in later.
You are going over the body hair several times getting the hair as even as possible.
Lightly skim the hair off from the top-line to the pin bone. The clipper is NOT against the body when doing this small area.
Lift the front leg and clean out the armpit area carefully.
German Trim - The Body
Tuck-up
Switch to the #1 comb to do the tuck up area.
Going against the grain we scoop out the tuck up area towards the elbow.
The elbow is always the end point of the underline.
Making sure the tuck up is well defined and the underline is tight to the body gives our dog the illusion of more leg and of course makes this area easier to keep neat and tidy.
German Trim Tuck-up
Bringing these steps together
Now we are going to start blending these areas together.
Mist your dog lightly with conditioning spray and comb all the hair out and away from the body. Looking at the dog in profile and using a longer straight shear we are going to start at the base of the tail and scissor in the top-line. Make sure the dog is standing properly in a 4 square position. Bend down to be sure you can see the top-line and scissor it in evenly from the base of the tail to the withers.
Next taking your short curved shears trim in the tuck up. Flipping the curved shears the correct way continue the underline down to the elbow.Lift up the front leg and be sure the underline continues all the way under the leg to the chest.
Next comb all the hair around and in front of the base of the tail. You want the base of the tail tight to the body. Keep looking at your poodle in profile and use your interpretation of the trim to trim in the base of the tail and the shelf (at the pin bones)
Holding the tail out level with the top-line and using the curved shears in reverse trim the base of the tail into the top-line so that it forms a continuous unbroken line. To finish the rear angulation use your longer curved shears in reverse and tidy this entire line.You want the hocks to appear short. Remember to wrap the scissor work all the way around the leg.
Blend the leg into the body. Lastly look at the dog in it’s entirety and make sure it all looks blended.
Bringing these steps together
Shoulder Layback
Comb all the hair at the sides of the neck up and out towards the clippered part of the neck.
Standing I front of the poodle you are trimming under the ear to start.
Hold your longer curved shears backwards (so the point of the shear is pointing at you)
Blend from the neckline rolling the hair into the clipper-combed hair and onto the scissored hair of the neck keep combing and scissoring and continue scissoring up and around the ear
Pay particular attention to the ear-set making the hair short and tight around the ear.
The bottom of the neck where it meets the back should be about even with the length of the hair on the back of the front leg.
You and blending and blending until there is no discernible line where the hair was clipper-combed.
At this point you can carefully edge the ear with your shears.Follow the natural outline of the dogs ear.
German Trim - Shoulder work
Shoulder Front Angulation, Chest and Front of Neck
Using the curved shears once again in reverse come up the front of the front leg and blend the top of the front leg into the chest hair.Be aware of the angulation you trimmed in in the back legs and be sure to balance the angulation in the front. Again this takes practice and your artistic interpretation of your dog’s angulation.
As you come up the front of the leg and start the upper angulation your curved shears are in the reverse position but as you get to the post sternum you will flip your shears back to the correct position to blend the rest of the chest into the neck
You are combing and re scissoring to get a smooth even look.
Shoulder Front Angulation, Chest and front of Neck - German Trim
Bevels - German Trim
Bevels
To start the bevels you will comb all the hair down and around your clipper work
Start at the back side of the foot, place the shear on the clipper line and cut all the hair from the back of each foot
Starting at the back of the foot allows you to see how you will make your dog look like he is standing right up on his toes.
Continue this technique, combing the hair down the front of the feet and cutting the hair even with the clipper-work.
This is a great way to show off your dog’s good feet.
Front Legs
Now comb the legs and spray with CCS thick n thicker spray to help the legs hold the shape as you scissor
Comb all the leg hair up from the bevel and shake the leg so the hair lands naturally
Spray with thick and thicker
Start at the bevel with the short curves and clean up the bevel
Then with a longer straight shear scissor the front leg straight and even paying close attention to the armpit area
You want a nice straight line from the shoulder all the way down the leg
We want the front legs to look like cylinders or stove pipes, we do not want them to taper like a table leg.
Remember to think in 3-d and make sure the leg is even and symmetrical all the way around.
Comb, shake and spray again and scissor with the straight shear all the way up the leg to the area that you already scissored with the curved shears.(shoulder and chest)
To finish the leg you can go back to the curved shear to tidy and check the roundness of the leg.
Make sure the insides of the legs are nice and straight as well.
Check the inside of the front legs from the rear angle as well.
Front Legs - German Trim
Rear legs
Comb the hair up from the bevel.
Shape the hair to look as perfectly as possible and spray with the CCS Thick n thicker
Starting from the bevel with the shorter curved shear clean up the bevel and start scissoring up the leg
Switching to the straight shear come upthe side of the leg scissoring the leg evenly into the hip
At this point stand at the back of your dog and decide where the leg will end and make sure it is even on both sides.We call this point the finish point.
Setting the finish point allows you to scissor up the side of each leg and have them end up relatively even at the end.
Comb and re spray so you can set the very important look of the back leg with ease.Continue scissoring until you have cleaned up all the way around the leg and on the inside of the leg as well.
Switching to a longer pair of straight shears to do the finish work will allow you to take fewer “cuts” and therefore can improve the look of your finish.
The insides of the back legs usually require a lot of scissoring.
Rear Legs - German Trim
The Head
Take your dog off the grooming loop to properly trim the head
Comb the head and down into the neck as thoroughly as possible making sure to get all the little hairs up so they can be scissored off
Comb all the topknot hair forward and over the eyes
Using the curved shears trim in the visor
You will leave some hair hanging over the front of the eyes.The hair does not go straight up from the front of the eyes, the beveled overhand gives this trim it’s dramatic look
Trim the front of the topknot and over the top of the topknot using your curved shears pointing the correct way. When you start to do over the ear (top of the ear, at the skull line) you will hold the curved shears backwards to help create the bevel.
Comb and re scissor the head several times until it is as tight or as big as you think fits the dog and the trim.You are using your artistic license at this point.Also go over the topknot several times so that you know the hair is even and has a nice finish.
You come up and over the ear and continue all the way around to the clipper line on the front of the neck.
Clean up the visor around the eyes making sure you help accentuate the poodle expression.
Now comb all the topknot to one side and trim everything sticking our or looking uneven.
Comb over to the other side and repeat
Gently grasp and ear in each hand and give the head a shake (as if the dog was shaking his head) and then re check to see if there are any areas that need more finish.
The Head - German Trim
Finishing the Head and Neck - German Trim
Finishing the head and neck
With the hair combed and shaken out using your longer curved shear go over the top of the head leaving more hair n the top of the head will help your dog appear like he has more neck and look fancier
Keep the front of the visor round and neat
Blend the back of the topknot into the neck
View and trim the topknot also from the back view of the dog so you are assured it holds it shape from every angle
When working your way into the neck flip your curved shears round backwards so that the point is going towards your face and this will help you get the most blending action with your shear with the least amount of work.
Remember that where the neck blends into the back is the same line as the hair on the back of the front leg
As you trim the neck into the topknot use the curved shear up and over the neck in revere and as you get to the occiput flip the shears the other way to scissor the topknot the same would go in reverse when trimming from the topknot down into the neck The occiput is the point at which you flip your shears the other way.
When you are trimming the dog you want to make sure that the head in held in the correct head position.Holding the dog’s head too far down will result in you getting the shape wrong and often creating a “divot” that often results in your poodle looking “ewe necked”
Dogs with thinner or longer topknots may need a little bodifying spray or hair spray to help the topknot
Finishing thoughts
When your trim is done the bottom of the neckline where it joins the back will be in line with the hair at the back of the back leg
The German Trim is a great fancy trim for non-regular classes and grooming competitions
The German Trim is traditionally presented in North America with clean feet and face and no mustache and full feet (although this is also considered a German Trim)
Ears and tail should match so remember to use the same blade on the ears as the back of the tail
Finishing up - German Trim

When stacked, the Pin Bone will line up with the Front Legs

You should be able to draw a straight line from the back of the Neck down the front of the Back Leg

The base of the Neck should line up with the back of the Back Leg
QUICK LINKS
All Group 7 | Everything Poodle
All Group 7 | Advanced Masterclasses
Directory Page | All Grooming Tutorials

Search igroomhub

Group 7 | Salon Styling
Professional Dashboard
